This guide provides clear steps to assemble nutritious and attractive lunch boxes for kids, suitable for parents or caregivers. It covers planning, packing, and safety considerations to ensure the lunch is both appealing and practical. No prior experience is necessary, and the process takes approximately 15 to 30 minutes.

Get kitchen staples and gadgets delivered free with Prime
- Fast, free delivery on millions of items
- Prime Video, Amazon Music and more included
- Member-only deals all year
Difficulty: Beginner | Time: 15-30 minutes
What You’ll Need
Tools & Materials:
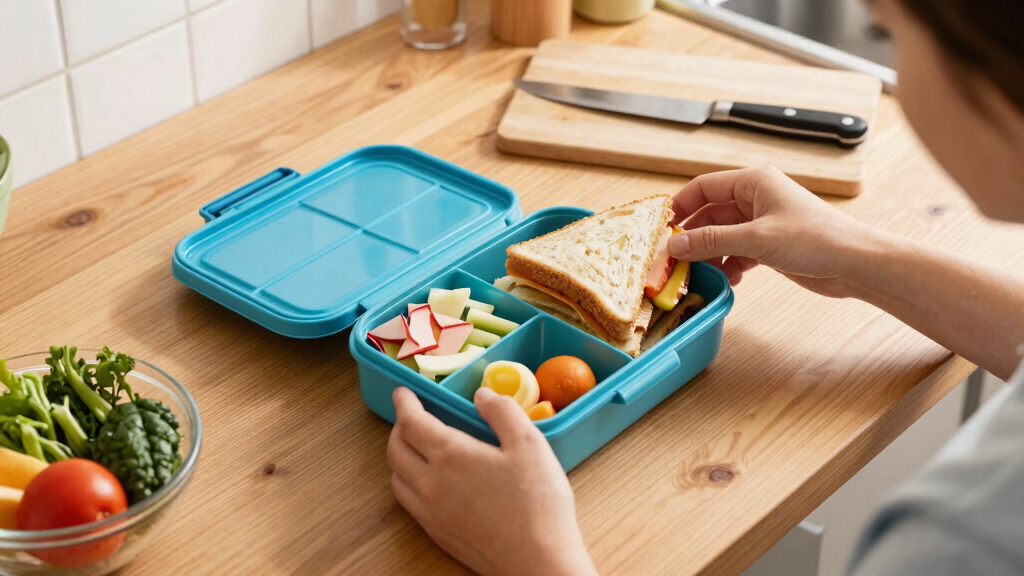
- Lunch box containers (preferably with compartments)
- Reusable snack bags or small containers
- Cutting board
- Knife
- Food-safe labels (optional)
Knowledge:
- Basic understanding of nutrition and portion sizes
- Ability to safely handle kitchen tools
Prepare ingredients in advance to save time. Choose containers that are microwave-safe if reheating is needed. Select age-appropriate portions and avoid foods that pose choking hazards for young children.
kids lunch box with compartments
As an affiliate, we earn on qualifying purchases.
As an affiliate, we earn on qualifying purchases.
Before You Start
Check the lunch box for cleanliness and durability. Verify that all containers are leak-proof and that the lunch box is suitable for your child’s age. Gather all ingredients and tools before beginning to streamline the process.
leak-proof lunch containers for kids
As an affiliate, we earn on qualifying purchases.
As an affiliate, we earn on qualifying purchases.
Step-by-Step Instructions
Choose a variety of foods that are nutritious, appealing, and appropriate for your child’s taste and dietary needs. Include a protein, a carbohydrate, vegetables or fruit, and a small treat if desired.
Tip:
Involve your child in choosing items to increase their interest and acceptance.
Check:
The menu includes at least one protein, one carbohydrate, one fruit or vegetable, and a small treat, balanced for nutrition and variety.
Step 2: Prepare ingredients
Wash fruits and vegetables thoroughly. Slice or cut foods into manageable, bite-sized portions. Cook or reheat items as needed and allow them to cool before packing.
Tip:
Use leftovers or pre-cooked items to save time. Avoid packing hot foods to prevent condensation and spoilage.
Check:
All foods are prepared, cooled, and ready to pack without excess moisture or mess.
Step 3: Pack the main components
Place proteins, carbohydrates, and fruits/vegetables into separate compartments or containers within the lunch box to prevent mixing and sogginess.
Tip:
Use small containers or snack bags inside the main lunch box to keep foods separate.
Check:
The lunch box is organized with distinct sections, preventing cross-contamination and maintaining freshness.
Step 4: Add extras and treats
Include small treats, dips, or condiments in separate small containers or packets. Add any preferred utensils, napkins, or notes.
Tip:
Use portion-controlled treats to avoid overindulgence.
Check:
Extras are packed separately, ready to add just before eating if necessary.
Step 5: Seal and label the lunch box
Close the lunch box securely. If desired, label it with your child’s name using a waterproof marker or label tags.
Tip:
Check that all lids are tightly sealed to prevent leaks during transport.
Check:
The lunch box is securely closed, labeled, and ready for transport.
As an affiliate, we earn on qualifying purchases.
Common Mistakes to Avoid
- Overpacking foods that are prone to spoilage or leaks. — Choose leak-proof containers and avoid packing perishable foods without refrigeration or cooling packs.
- Including foods that are choking hazards for young children. — Cut foods into small, manageable pieces and avoid nuts, whole grapes, or hard candies for younger kids.
- Not considering portion sizes suitable for the child’s age. — Use age-appropriate portion sizes and measure servings if necessary.
As an affiliate, we earn on qualifying purchases.
Troubleshooting
Problem: Food leaks or spills in the lunch box.
Solution: Ensure all containers are tightly sealed and use leak-proof lids. Place liquids in separate, secure containers.
Problem: Foods becoming soggy or wilted.
Solution: Pack wet or moist foods in separate containers with tight-fitting lids and add crispy items just before eating.
Problem: Child refuses to eat the lunch.
Solution: Involve the child in menu planning, keep foods familiar and appealing, and avoid packing too many new or disliked items.
What Success Looks Like
The finished lunch box contains a balanced variety of foods, all properly packed and sealed, with no leaks or spoilage. It looks appealing, and the child is ready to eat with everything intact and fresh.
Next Steps
Inspect the lunch box daily for freshness and cleanliness. Replenish ingredients as needed and vary the menu to keep it interesting. Teach your child to open and close the containers properly and to handle the lunch box carefully during transport.
Frequently Asked Questions
How can I keep the lunch fresh until mealtime?
Use insulated lunch boxes with ice packs or frozen juice boxes to keep foods cold. Pack perishable items last and avoid packing foods that spoil quickly without cooling.
What are safe options for young children with food allergies?
Select allergy-safe foods and always read labels. Prepare separate options for children with allergies and communicate clearly with school staff.
How can I make lunch boxes more eco-friendly?
Use reusable containers, snack bags, and utensils. Avoid single-use plastics and opt for biodegradable or recyclable materials whenever possible.
What if my child refuses certain foods?
Introduce new foods gradually, involve your child in packing, and offer a variety of options to encourage acceptance over time.
Halloween Picks
halloween
As an affiliate, we earn on qualifying purchases.