TL;DR

Get kitchen staples and gadgets delivered free — and shop member deals
- Fast, free delivery on millions of items
- Access to Prime Big Deal Days deals on October 6–7
- Prime Video, Amazon Music and more included
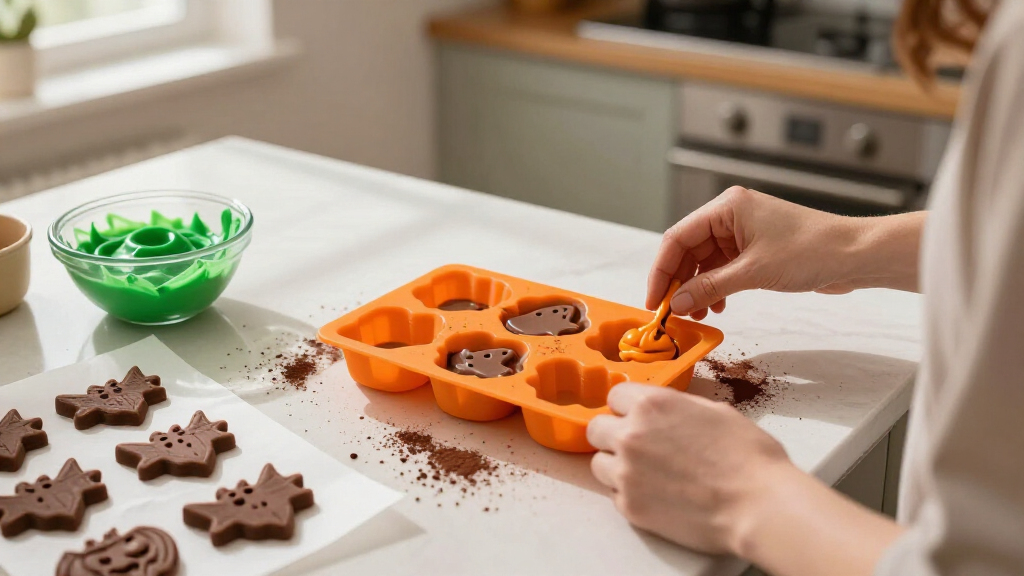
Halloween-themed snack molds are trays (usually silicone or plastic) shaped like skulls, pumpkins, ghosts, and bats that turn ordinary chocolate, gummies, ice, and baked goods into spooky treats. Silicone molds are the best all-around choice for beginners — they’re flexible, non-stick, and safe from roughly -40°F to 440°F — and most cost just $5–$15. With candy melts and a few release tricks, you can make party-worthy treats in under an hour.
Last October, my neighbor spent 45 minutes and about $12 making skull-shaped chocolates that looked like they came from a boutique candy shop. I’d spent three hours frosting ghost cookies that still looked like sad blobs. Guess whose platter emptied first?
That’s the quiet superpower of Halloween-themed snack molds: they do the decorating for you. The mold holds the shape, holds the detail, and holds the wow. You just melt, pour, chill, and pop out treats that look far more skilled than the effort they took.
In this guide, you’ll learn the types of molds worth buying, the easiest beginner treats, the tricks that keep chocolate from sticking, and the food-safety basics most people skip. Let’s make your Halloween table the one people photograph.
Silicone molds rated -40°F to 440°F are the most versatile buy — but verify the oven rating, since freezer-safe doesn’t guarantee oven-safe.
Candy melts + a $10 silicone tray is the easiest beginner project: 20 minutes, no tempering, glossy professional-looking results.
Chocolate sticks because of untempered chocolate or condensation — dry molds completely and let treats set fully before releasing.
Only buy molds labeled FDA-approved or LFGB food-grade, and never return a craft mold to food use.
Shop in August–September for the best selection; standard trays cost $5–$15 and 3D specialty molds $15–$30.
Which Type of Halloween Mold Should You Actually Buy?
Halloween-themed snack molds come in four main types: silicone molds, rigid plastic candy molds, shaped metal pans, and ice/drink molds. Silicone is the most popular category by far — it’s flexible, non-stick, and typically rated from -40°F to 440°F, meaning one tray can make ice cubes in the morning and mini cakes that afternoon [1].
Think of silicone as the Swiss Army knife of the group and plastic molds as a one-trick pony — a cheap, effective one. Plastic molds cost a few dollars and produce sharp details in chocolate, but they crack, they’re freezer-only, and you’ll be tapping them nervously over the counter hoping things release.
| Type | Best For | Temp Range | Price | Beginner Rating |
|---|---|---|---|---|
| Silicone | Chocolate, gummies, ice, baked goods, frozen treats | -40°F to 440°F (typical) | $5–$15 | Excellent |
| Plastic candy molds | Chocolate, candy melts | Room temp / freezer only | $2–$8 | Good (with practice) |
| Metal shaped pans | Cakes, brownies, quick breads | Oven-safe | $10–$25 | Good |
| Ice/drink molds | Ice, frozen juice, punch-bowl floaters | Freezer only | $5–$12 | Excellent |
One distinction people miss: flat tray molds versus 3D two-piece molds. Flat molds give you one detailed face — great for chocolate skulls. 3D molds snap together to create freestanding shapes, and they’re behind the recent skull hot cocoa bomb craze all over TikTok and Pinterest [1]. Those run $15–$30, but the payoff is real.
Check the label before you bake: a mold marked freezer-safe is not automatically oven-safe. Freezing and baking ratings differ — always verify the actual temperature range.
7 Beginner Treats You Can Make With One $10 Mold
The easiest Halloween molded treats for beginners are candy melt chocolates — you melt, spoon, tap, and chill, with no tempering required. From there you can branch into gummies, ice, and baked goods using the exact same tray. Here are seven ideas ranked roughly by difficulty:
- Candy melt shapes — Wilton candy melts + a skull or pumpkin silicone tray. 20 minutes total, glossy finish, zero skill needed. This is the universally recommended starting point [1].
- Spooky ice cubes — skulls, fingers, eyeballs for punch bowls and cocktails. Freeze water, juice, or coffee for “spooky latte” effects trending on social media. (Adult drinks only — enjoy responsibly.)
- Homemade gummies — gelatin brains and worms. Kids lose their minds over these.
- Mini brownie bites — oven-safe silicone pumpkin trays, 18–20 minutes at 350°F.
- Frozen yogurt or juice pops — ghost-shaped, healthy-ish, toddler-approved.
- Hot cocoa bombs — sphere or skull molds filled with cocoa mix and marshmallows. The trend that exploded post-2020 and hasn’t slowed [1].
- Rice cereal treats — press the mixture into greased molds, pop out, dip in chocolate. No baking at all.
The pattern is simple: one $10 themed snack mold covers at least four of these. Start with candy melts, build confidence, then graduate to gummies and cocoa bombs.
Why Your Chocolate Sticks — and 3 Fixes That Work
Chocolate sticks to molds for two reasons: untempered chocolate and condensation. Understanding the difference matters, because the fixes are different — and so is the blame.
Untempered chocolate is a chemistry problem. Real chocolate contains cocoa butter, which forms crystals as it cools. When chocolate is properly tempered, those crystals lock into a stable structure that contracts slightly as it sets — that shrinkage is literally what pulls the chocolate away from the mold walls. Professional chocolatiers temper by heating and cooling to precise temperatures (melt to about 115°F, cool to 80°F, rewarm to 88–90°F for dark chocolate). If you skip this and just melt a bag of chocolate chips, the cocoa butter sets into loose, unstable crystals. The chocolate stays the same size as the cavity, grips every contour, and you end up chipping a half-skull out of the mold with a butter knife. It’ll still taste fine — but it’ll look like an archaeological find.
Condensation is simpler and sneakier. Water is the enemy of chocolate in any form — even a damp fingerprint or a mold pulled from a humid room creates a micro-layer of moisture between chocolate and silicone that acts like glue. This is why the old advice “pop it in the freezer” backfires: pull a cold mold into a warm kitchen and condensation instantly forms on the surface, sometimes leaving white “sugar bloom” streaks or welding the chocolate in place.
The fix chain, in order of effort:
- Use candy melts instead of real chocolate. Candy melts (like Wilton’s) replace cocoa butter with vegetable fats that set hard and contract without tempering. This is the single biggest upgrade a beginner can make — it trades a chemistry lab for a microwave. The tradeoff: candy melts don’t taste like couverture chocolate, so purists will notice. For party favors and kids’ treats, nobody cares.
- Dry your mold thoroughly. Wash it, then towel-dry and air-dry for 15 minutes. Silicone holds an invisible film of water after washing more than plastic does.
- Set in a cool room, not the freezer. 20–30 minutes at 65–70°F, or 10 minutes in the fridge if your kitchen is warm. Fully set chocolate looks matte at the edges and pulls slightly inward — if any cavity still looks glossy and flush with the rim, give it more time.
Then invert and flex. With silicone, the shape should drop out with a gentle push on the underside. Here’s the diagnostic: if one or two cavities stick but the rest release cleanly, it was probably a moisture or air-bubble issue in those spots. If everything sticks, your chocolate wasn’t tempered (or wasn’t candy melts) — fix the ingredient, not the technique.
Want colored details like orange pumpkin faces or white skull teeth? Use the “painting in the mold” technique: brush a thin layer of colored candy melt into the recessed details first — think of it like painting the numbers on a paint-by-numbers kit before flooding the background — let it set for 5 minutes, then fill the rest of the cavity with your base color. Those two-tone Pinterest skulls? Painting, not magic. One caution: if the first layer isn’t fully set before you flood the cavity, the colors bleed together and your skull’s teeth become a ghostly smear.
For gummies, the physics are different again. Gelatin stays rubbery and slightly tacky even when cold, so pushing it out from behind just compresses it into the cavity. Instead, chill the tray fully, then peel the silicone away from the gummy, working from one edge like removing a sticker. Rush it while warm and you’ll rip the nose off every ghost — a lesson I learned the night before a preschool party, frantically trimming noseless ghosts with scissors at 11 p.m.
Food Safety Basics Most Mold Users Skip
Most molded Halloween treats are safe by default — which is exactly why this section gets skipped, and why it shouldn’t be. The risks here aren’t dramatic; they’re quiet ones that show up a day later, or at a party where one guest has an allergy nobody asked about. Three habits cover nearly everything: buy certified food-grade molds, keep perishable treats cold, and never move a mold from craft use back to food use.
Why certification matters, not just the word “silicone.” “Food-grade” isn’t a material — it’s a manufacturing standard. It means the silicone was formulated without fillers and plasticizers that can leach into food, especially fatty food. And chocolate is fatty food: cocoa butter is an efficient solvent that absorbs whatever it touches, which is also why chocolate picks up flavors from your kitchen. Two certifications to look for: FDA-approved food-grade labeling (the US baseline) or LFGB, the stricter German/European standard that serious bakers prefer — LFGB testing is tougher on leaching, so it’s the better signal when both appear [1]. The practical red flag: cheap unmarked silicone from overseas marketplaces. A quick quality test bakers use — pinch and twist a corner of the silicone. If it shows white streaks, it likely contains filler, and filler-grade silicone is the kind that can leach and hold odors. If a listing can’t name its certification, pass; the $4 you save isn’t worth re-melting the batch. BPA-free labeling matters here too, and buyers increasingly check for it [1].
Why the craft-mold rule is absolute. This is the mistake that looks harmless: you make soap skulls in October, wash the tray well, and pour chocolate skulls in November. The problem is that silicone is porous at a microscopic level and absorbs compounds it contacts — candle fragrance, resin, soap pigments — that don’t fully wash out, and some craft materials (resin especially) simply aren’t rated for food contact at any level of cleaning. It’s not a “wash it harder” situation; it’s a one-way door. Example scenario: a crafter makes resin-coaster ghosts in the same mold she uses for gummies, and every gummy afterward carries a faint chemical taste. Once it’s a craft mold, it stays a craft mold — label it with a marker and move on. Molds are $5; a guest’s trust isn’t replaceable.
Storage rules for the treats themselves — and why each one exists:
- Molded chocolates: 2–3 weeks ahead is fine, stored airtight in a cool, dark spot below 70°F [1]. The enemy isn’t bacteria (chocolate is too dry and sugary for most pathogens) — it’s fat bloom, that grayish film that appears when cocoa butter melts and re-crystallizes. It’s harmless but looks unappetizing; heat and light speed it up.
- Gummies and gelatin: refrigerate, eat within 5–7 days. Gelatin is water-rich and protein-rich — basically a petri dish with a fun shape. At room temperature, gummies weep moisture, stick together, and eventually mold. This is the treat to make closest to party day.
- Anything with dairy (mousse-filled skulls, frozen yogurt shapes): keep at 40°F or below, per USDA cold-storage guidance. The party-planning implication: if your spooky mousse skulls will sit on a buffet table for three hours, they’re a dairy risk — pick chocolate or gummies for the table, and serve dairy treats straight from a bowl of ice.
- Allergen note: most candy melts contain milk and soy; many processing lines share tree nuts and peanuts. This matters more at Halloween than at other parties because treats are often unwrapped and unlabeled — guests can’t read an ingredient list on a chocolate skull. If you’re serving a crowd, print a little card listing ingredients, or keep nut-free treats on a separate, clearly marked platter.
Care habits that prevent slow failures: wash new molds before first use (manufacturing residue is real), and hand-wash after. Some molds are labeled top-rack dishwasher-safe, but there’s a tradeoff: dishwasher heat and detergent gradually degrade silicone and can leave soap residue that scents your next batch of chocolate — remember, fat absorbs flavor. Thirty seconds of hand-washing preserves mold detail for years. Example: my first skull tray went through the dishwasher weekly one season and came out smelling faintly of lemon detergent; every chocolate after that tasted like haunted dish soap. Lesson absorbed, literally.
Where and When to Shop (Timing Is Everything)
The best selection of Halloween molds appears in August and September, when craft stores like Michaels and Joann, plus Walmart, Target, Amazon, and kitchen shops, stock their seasonal aisle [1]. Wait until October 15th and you’re choosing between a mangled bat tray and someone’s returned pumpkin pan.
Price guide so you don’t overpay: standard silicone trays run $5–$15, specialty and large 3D molds $15–$30, and basic plastic candy molds as little as $2–$4 [1]. Reliable brands include Wilton, Silikomart, and Lekue, though plenty of generic food-grade silicone performs fine. Also worth knowing: Día de los Muertos sugar skull molds have grown well beyond October 31, so they often stay in stock into November — handy if you’re planning ahead for next year at clearance prices [1].
And yes, the same molds now pull double duty beyond candy. People use them for shaped cheeses and chocolates on “boo-tery” charcuterie boards — one of the fastest-growing party trends [1]. Your skull tray works in January too. It just becomes a very committed coffee ice cube.
Frequently Asked Questions
Are silicone molds safe for food?
Yes, when they’re labeled food-grade — look for FDA approval or the stricter European LFGB certification. Cheap unmarked silicone is a gamble, so buy from reputable brands or listings that name their certification. BPA-free labeling is standard on quality molds.
Can I use the same mold for chocolate and ice?
Yes, silicone handles both. Just hand-wash between uses so soap residue doesn’t scent your chocolate — silicone holds odors. Many bakers keep separate molds for savory items and sweets anyway, which is an easy habit if you make flavored ice.
Why does my chocolate stick to the mold?
Usually one of two causes: untempered chocolate that never contracts, or moisture inside the cavity. Switch to candy melts (no tempering needed), dry the mold completely, and let the chocolate set fully in a cool room or briefly in the fridge before releasing.
How far in advance can I make molded chocolates?
2–3 weeks, stored airtight in a cool, dark place below 70°F. Gummies and gelatin treats are shorter-lived — refrigerate and finish them within 5–7 days.
What’s the easiest Halloween treat for a total beginner?
Candy melts in a silicone mold. Melt, spoon into the cavities, tap out air bubbles, chill 20–30 minutes, and flex the tray to release. No tempering, no baking, no special skills — and the results look genuinely professional.
Conclusion
Here’s the whole strategy in one line: buy one food-grade silicone mold, a bag of candy melts, and a paintbrush — that’s under $20 and it produces party treats that look like you hired a chocolatier. Everything else in this guide is refinement, not requirement.
This Halloween, skip the three-hour cookie frosting marathon. Melt, pour, chill, flex. Then watch guests pick up a chocolate skull, turn it over in their hands, and ask where you bought it.
Fall Picks
fall essentials
As an affiliate, we earn on qualifying purchases.