
TL;DR
Moving your rig out of sight and mind beats most soundproofing tricks. Proper placement, ventilation, and targeted acoustic treatment make a huge difference in small spaces like closets. This guide covers how to do it right without breaking the bank.
If you’ve ever crammed a gaming PC or a high-power inference rig into a tiny closet, you know the sound can be deafening. But there’s a smarter way to tame that noise than just slapping foam everywhere. The secret isn’t just acoustic dampening — it’s where you put your gear and how you treat the space around it. You can learn more about acoustic dampening, placement, and the ‘Rig in the Closet’ setup.
In this article, you’ll learn how to make your small workspace quieter, calmer, and better sounding. From simple placement tricks to building a closet setup that keeps everything cool, I’ll show you what really works — no fluff, just real-world advice.
Acoustic dampening
& the rig in the closet.
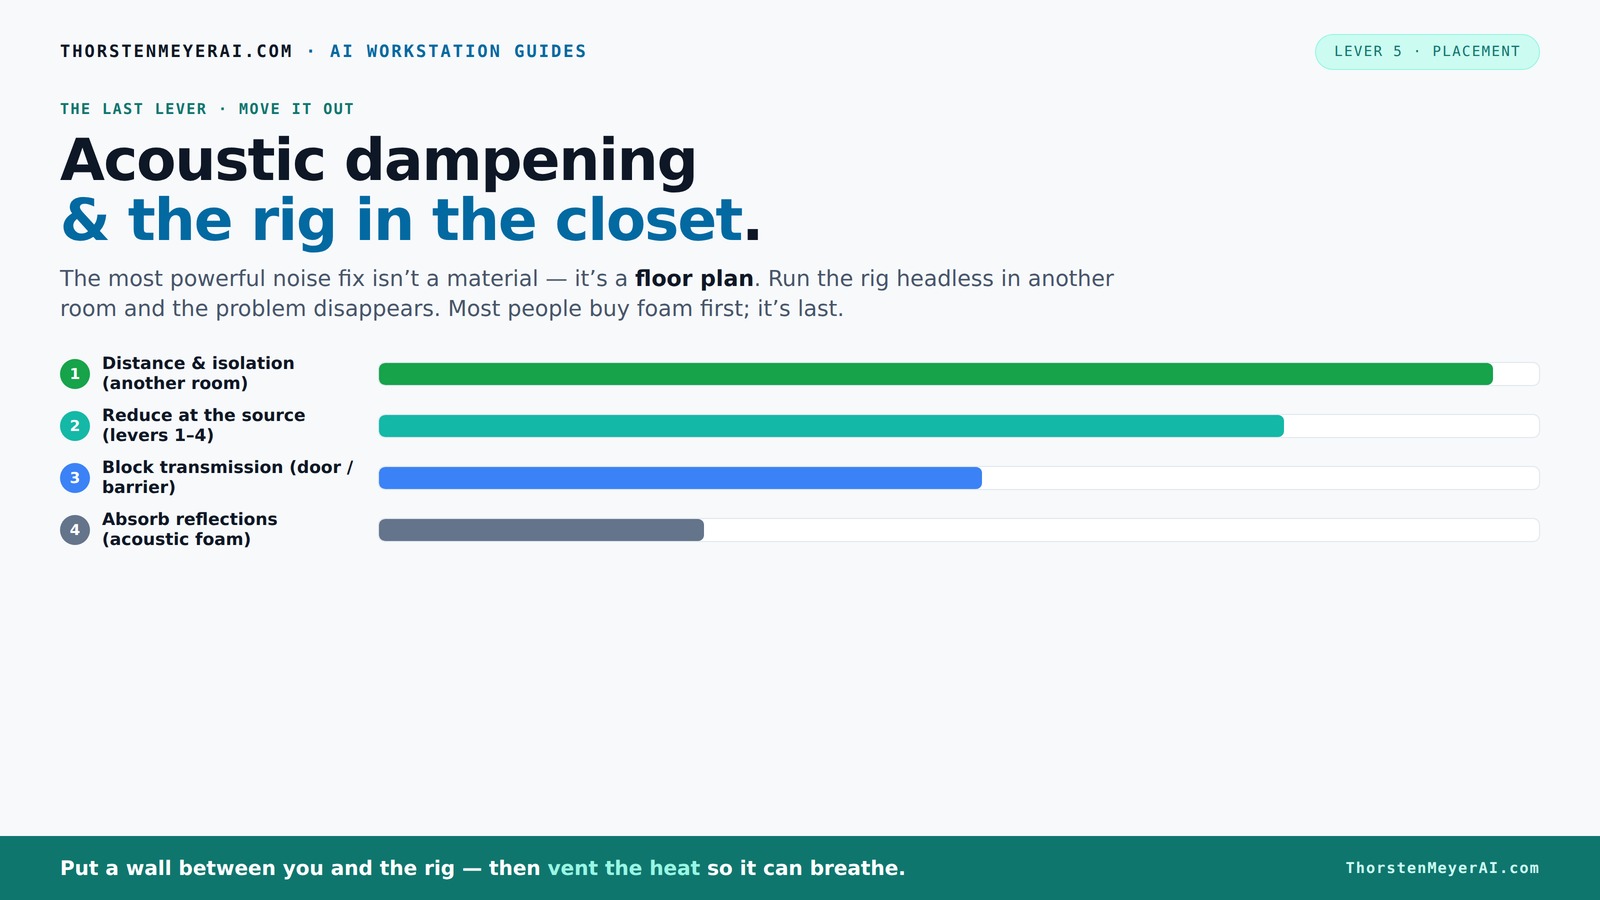
The most powerful noise fix isn’t a material — it’s a floor plan. A rig you can’t hear because it’s in another room beats any amount of foam. Tap the approaches in Part 1 to see what actually works.
(another room)
(levers 1–4)
(door / barrier)
(acoustic foam)
Contain the noise, not the heat
Key Takeaways
- Moving the rig into a separate room or closet is the most effective way to cut noise, often reducing perceived loudness by over 90%.
- Acoustic dampening improves sound clarity but doesn’t block noise; sealing gaps and barriers are essential for soundproofing.
- Place treatment at reflection points — behind the mic, ceiling, and hard surfaces — rather than randomly covering walls.
- Ventilation is critical in closet setups to prevent heat buildup, which can throttle performance and cause fans to roar.
- Don’t rely solely on foam; combine absorption, sealing, and placement strategies for best results.

Focusound 52 Pack Acoustic Foam Panels 1" x 12" x 12" Sound Proof Foam Panles Soundproofing Noise Cancelling Wedge Panels for Home Office Recoding Studio with 300PCS Double-Side Adhesive
Soundproofing - Acoustic foam panels triangular grooves structure for better noise absorption, helps to reduce and absorb unwanted...
As an affiliate, we earn on qualifying purchases.
As an affiliate, we earn on qualifying purchases.
What a 'Rig in the Closet' Actually Means
A 'rig in the closet' isn’t just a meme — it’s a practical solution for keeping noise contained. Instead of sitting next to a roaring machine, you place it inside a closet, sealing it off from your workspace. The result? Far less noise in your ears and a cleaner environment for recording or working.
Imagine your GPU and CPU as a thunderstorm. Storing them inside a closet acts like a mountain range — it muffles the storm’s roar. But don’t forget, heat builds up fast, so ventilation is crucial. This setup is perfect for voice-over artists, streamers, or anyone who needs a quiet space without sacrificing power.
Choosing to put your rig in a closet involves tradeoffs. While it significantly reduces noise, it also concentrates heat, which can throttle performance or damage components if not properly managed. Ventilation becomes a critical part of the design — you can find helpful tips in acoustic dampening, placement, and the 'Rig in the Closet' setup. Additionally, accessibility can be limited, making maintenance or upgrades more challenging. Understanding these tradeoffs helps you decide if a closet rig aligns with your priorities — quieter operation versus potential heat management issues.

TroyStudio Speaker Isolation Feet, 1.2" (8 Pcs) EVA Acoustic Foam Pads for Studio Monitor Pair, Turntable Isolation Base to Reduce Vibration & Resonance, Non Slip Spikes for Desktop, Home Theater
【SPECIFICATION】: Featuring a discreet 1.2 inch diameter and equipped with powerful self-adhesive backing, each set of 8 isolation...
As an affiliate, we earn on qualifying purchases.
As an affiliate, we earn on qualifying purchases.
Why Acoustic Dampening Is Less About Foam & More About Sound Control
Many think slapping foam on the walls instantly makes a space silent. That’s a myth. Acoustic dampening reduces echo and flutter echoes inside a room — it’s about softening reflections, not stopping sound from escaping or entering. You can explore more about acoustic dampening, placement, and the 'Rig in the Closet' setup.
For example, hanging blankets two inches from the wall can cut down reflections by up to 50%. But foam alone won’t block noise from leaking into the next room. That requires a solid barrier, like a door seal or a barrier wall.
Research shows that in small spaces, reflections and low frequencies are the main culprits making recordings sound boomy or boxy. Proper placement of absorbers—especially at reflection points—makes a real difference. Think of dampening as fine-tuning the sound within your space — reducing harshness and making recordings clearer. But it’s not a substitute for soundproofing; it’s a complementary process that improves clarity but doesn’t necessarily keep noise out. Understanding this helps you prioritize where to put your treatment — at reflection points for clarity, and barriers for containment.

Audimute Soundproofing Acoustic Door Seal Kit - Door Sweep and Seal - (Large Size)
Includes (2) Door Seals (3/16" x 1/2" x 50') and (1) Door Sweep (1/2" x 1.5" x 25').
As an affiliate, we earn on qualifying purchases.
As an affiliate, we earn on qualifying purchases.
Where to Place Sound Treatment for Maximum Effect
Effective placement of acoustic panels and blankets is the secret sauce. Start with the reflection points — the wall behind your mic, the ceiling above, and the desk surfaces near you. Use a mirror trick: hold a small mirror against the wall while recording, and mark where the sound bounces directly into the mic. For more detailed guidance, see acoustic dampening, placement, and the 'Rig in the Closet' setup.
For example, in a tiny closet, hanging a thick blanket about two inches from the wall behind your mic can drastically reduce flutter echoes. Larger panels or bass traps at the corners can tame low frequencies that cause boominess.
Remember, treating only the corners won’t solve everything. Focus on the spots where sound reflects the most. The goal: create a balanced, controlled sound environment. Proper placement ensures you’re addressing the most problematic reflections, which have the biggest impact on sound quality. Misplaced treatment might give a false sense of security without improving clarity. Think of it as strategic armor — target the weak spots for maximum effect.

2 Pack Bass Traps,24" X 12" Wooden Bass Traps Corner,Large Sound Echo Absorbers,Low Frequency Trap Standing Wave Acoustic Treatment for Home Studio,Listening Room or Theater
【WOODEN DESIGN】This sound absorbing panel is 24x12 inches, made of a solid wood frame, The surface is covered...
As an affiliate, we earn on qualifying purchases.
As an affiliate, we earn on qualifying purchases.
How Mic and Performer Placement Can Reduce Reflection & Noise
The position of your mic and how you sit matters more than you think. Keep the mic close — within 6 to 12 inches — and angle it slightly away from reflective surfaces. A good rule: never aim the mic directly at a wall or a window. You can learn more about mic placement and sound quality at Tiny Cook Lab.
For instance, if your mic points toward a hard, reflective wall, you'll get echo and harshness. Instead, position yourself so that the mic faces a soft surface or open space. Using a pop filter and a small shield also helps block unwanted reflections.
Experiment with distancing yourself from walls and placing a soft cloth behind you. These tiny adjustments can cut echo and improve clarity without adding a single piece of foam. The key is to understand how sound waves bounce and reflect, and to position yourself and your gear in a way that minimizes these reflections. Small changes in placement can have outsized effects on recording quality, especially in confined spaces.
Treating the Ceiling, Floor, and Door—Common Weak Points
The ceiling and door are often the biggest leaks in a closet setup. A hard ceiling reflects sound downward, creating flutter echoes. Hang a blanket or foam panel from the ceiling to absorb that bounce. For additional tips on sealing weak points, see acoustic dampening, placement, and the 'Rig in the Closet' setup.
For the door, use weatherstripping or acoustic seals to block gaps. Placing a thick blanket or a DIY door sock made from moving blankets can keep noise from escaping.
The floor? Cover it with a rug or carpet to cut down on reflections bouncing up from the ground. These small steps prevent sound from leaking or bouncing around, making your space sound tighter. Addressing these weak points is crucial because they often form the primary pathways for sound to escape or reverb to build up, undermining your acoustic efforts. Properly sealing and treating these areas can drastically improve the overall sound containment and clarity.
Avoiding the Biggest Closet Sound Mistakes
Don’t think foam solves everything. Foam absorbs sound but doesn’t block noise. Putting foam only in the corners or on the walls without sealing gaps leaves leaks open. And don’t ignore the door or ceiling — they’re weak points.
Also, avoid placing your mic too close to reflective surfaces. And remember: small spaces can cause low-end buildup, making your recordings sound boomy or muddy. Use bass traps or thicker panels if necessary.
Finally, don’t forget ventilation. Sealing a closet tight without airflow will turn it into an oven and damage your gear. Proper ventilation and airflow are as important as treatment. Neglecting ventilation can lead to overheating, which not only damages equipment but can also cause noise from fans to increase, defeating your purpose of quiet operation. The tradeoff is between noise isolation and heat dissipation — a balance that requires planning, such as installing quiet exhaust fans or ducting that doesn’t compromise your soundproofing efforts. Recognizing this balance is key to maintaining both a quiet and safe environment for your gear.
The Best Practical Tips for Your Closet Setup
- Use thick blankets or moving quilts, hung with a 2-3 inch gap from walls, to absorb reflections.
- Seal gaps around the door with weatherstripping or acoustic door seals.
- Place a rug or carpet under your desk or chair to reduce floor reflections.
- Position the mic close to your mouth, angled away from reflective surfaces.
- Provide ventilation — a small, quiet exhaust fan or ducting — to prevent heat buildup.
- Focus treatment on reflection points, not just corners or random spots.
- Use bass traps if the room sounds boomy or muddy.
- Run wires and ventilation outside the closet to keep noise from leaking.
- Run tests and listen carefully — adjust placement until the sound is clear and tight.
Frequently Asked Questions
Can a closet really be enough for recording vocals or voice-over?
Yes, if you treat the space properly. Focus on reflection points, seal gaps, and add thick blankets or panels. Keep the mic close and monitor for low-end buildup. It won’t sound perfect like a dedicated booth, but it can be surprisingly good.What’s the key difference between soundproofing and acoustic treatment?
Soundproofing blocks noise from escaping or entering a space — sealing gaps and adding barriers. Acoustic treatment reduces echo and reflections within a room, making sound clearer but not stopping noise transmission.Where should I place foam or panels in my closet?
Target reflection points — behind the mic, ceiling above, and nearby hard surfaces. Avoid just lining walls haphazardly. Use a mirror trick to find where sound bounces directly into your mic for best placement.Do I need foam in the corners or on the walls?
Corners are great for bass traps to control low-end buildup. Walls are best treated at reflection points, especially where sound bounces directly into your mic. Don’t over-treat — focus where it matters most.How do I stop sound from leaking through the closet door?
Use weatherstripping, acoustic seals, or blankets around the door edges. Hanging a thick blanket over the door can also help block leaks. These small steps make a big difference in containment.Conclusion
Turning a closet into a quiet, effective workspace is about more than just slapping foam on the walls. It’s a smart mix of placement, sealing, and ventilation — all aimed at controlling reflections and heat. When done right, your small space can sound like a professional studio.
Remember: distance from noise sources beats everything else. So, if noise is a big problem, think beyond treatment — move it out of your space. Your ears, your recordings, and your neighbors will thank you for it.